
Table of content
ETL stands for Extract, Transform, and Load. With the emergence of modern cloud technologies, many businesses are shifting their data from conventional on-premise systems to cloud environments by using ETL utilities. They used to leverage conventional RDBMS, which lacked performance and scalability. To achieve excellence in performance, scalability, reliability, and recovery, organizations are shifting to cloud technologies such as Amazon Web Services, Google cloud platform, Azure, private clouds, etc.
In a general ETL scenario, ETL is a streamlined process that fetches data from conventional sources by using connectors for analysis, transforms this data by applying different methodologies like filter, aggregation, ranking, business transformation, etc. that serves business needs, and then loads onto the destination systems which is generally a data warehouse. The illustration below can give you a clear picture of how ETL works.

Approach towards ETL in Snowflake
The journey begins with the Snowipe, an automated utility developed using Amazon SQS and other Amazon Web Services (AWS) solutions that asynchronously listen for upcoming data as it reaches Amazon Simple Storage Service (Amazon S3) and consistently loads it into Snowflake However, Snowpipe alone does not contribute to the phase “E” (Extraction) of ELT, as only the “COPY INTO” command is allowed in a Snowpipe.
In other words, we can achieve the following objectives using Snowpipe:
- Loading data files in different formats such as CSV, JSON, XML, Parquet, and ORC
- Adopting and improving the source database for better synchronization, such as stripping outer array for JSON and stripping outer element for XML
- Altering column names
- Altering column orders
- Omitting columns
- Parsing of data/time string into data/time object
Snowpipe is not capable enough to eliminate all problems that one can face while building a data pipeline. Therefore, for the following three reasons, Streams and Tasks are required for the rest of the process:
- Snowflake does not support data transformations such as numbers calculation and string concatenation.
- The data source is not in a typical 3N normalized form, so it must be loaded into multiple tables based on certain relations.
- The ELT jobs may not be restricted to create table joins but also involve more complex requirements such as SCD (Slowly Changing Dimension).
Roadmap to Build ETL Pipeline
There are multiple ways to build the ETL pipeline. You can either create shell scripts and orchestrate using crontab, or utilize the ETL tools available to develop a customized ETL pipeline. ETL pipelines are mainly classified into two types are Batch processing and Stream processing. Let’s discuss how you can create a pipeline for batch and stream data.
Build ETL Pipeline with Batch Processing
The data is processed in batches from the source database to the destination data warehouses in a conventional ETL infrastructure. There are different tools that you can use to create ETL pipelines for your batch processing. Below are the detailed steps that you need to go through while building an ETL pipeline for batch processing :
- Step 1. Create reference data: Reference data possess the static references or permitted values that your data may involve. You need the reference data while transforming the data from source to destination. However, it is an optional step and can be excluded if you want to omit transformation (as that of an ELT process).
- Step 2. Connectors to Extract data from sources: To build the connection and extract the data from the source, you need the connectors or the defined toolset that establish the connection. The data can be from a multitude of sources and formats like API, RDBMS, XML, JSON, CSV, and any other file formats. You need to fetch all diverse data entities and convert them into a single format for further processing.
- Step 3. Validate data: After fetching or extracting the data, it is crucial to validate the data to ensure it is in the expected range and omit it. For instance, you need to extract the data for the past seven days, and you will filter out the data that will contain records older than seven days.
- Step 4. Transform data: Upon validation, further data makeup includes de-duplication of the data, cleansing, standardization, business rule application, data integrity check, aggregations, and much more.
- Step 5. Stage data: This is the phase where you store the transformed data. It is not recommended to load transformed data directly into the destination warehouse. Instead, the phase allows you to roll back your operations easily if something goes against the criteria. The staging phase also provides Dashboard and Audit Reports for analysis, diagnosis, or regulatory compliance.
- Step 6. Load to data warehouse: From the staging phase, the data is pushed to destination data warehouses. You can either opt to overwrite the existing information or add new data with the existing record whenever the ETL pipeline loads a new batch.
- Step 7. Scheduling: This is the last and most crucial phase of streamlining your ETL pipeline. You can choose the schedule to refresh and load new data based on daily, weekly, monthly, or any custom time frame. The data loaded with the schedules can include a timestamp to identify the load date, making it easier to roll back any information and check the life of available information. Scheduling and task dependencies have to be done critically to refrain from facing any memory and performance issues.
Build ETL Pipeline with Real-time Stream Processing
Many modern sources such as social media, eCommerce platforms, etc., produce real-time data that requires constant transformations as it appears. You cannot perform ETL in the same way as you do in batch processing as it requires you to perform ETL on the streams of the data by cleaning and transforming the data while it is in the transition phase to the destination systems. Several real-time stream processing tools are available in the market, such as Apache Storm, AWS Kinesis, Apache Kafka, etc. The below illustration elaborates the ETL pipeline built on the renowned and frequently used Kafka.
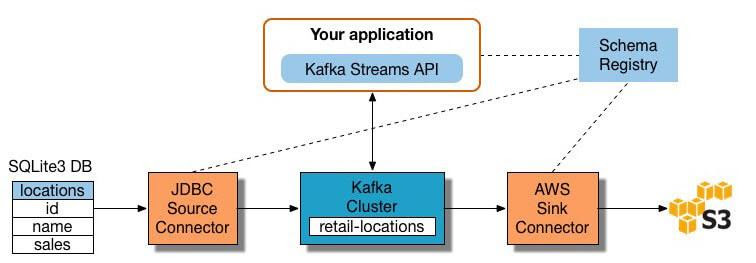
To create a stream processing ETL pipeline with Kafka, you have to:
- Step 1. Data Extraction:
The first step that you need to do is extract data from the source databases to Kafka using the Confluent JDBC connector or by writing custom codes that fetch each record from the source and then shift it into Kafka topic. Kafka automatically fetches the data whenever new records are found and pushes it to the topic as an update, making it a real-time data stream.
- Step 2. Pull data from Kafka topics:
The ETL application extracts the data from the Kafka topics either in JSON or in AVRO format. It is then deserialized to perform transformations by creating Kstreams. Deserialization in computing is the conversion of a string into an object.
- Step 3. Transform data:
Once you fetch the data from Kafka topics, you can perform the transformation on KStream objects with the help of Spark, Java, Python, or any other programming language. The Kafka streams handle one record and generate one or more outputs depending upon the transformation design.
- Step 4. Load data to other systems: The ETL application loads the streams into destination warehouses or data lakes after the transformation.
Conclusion
We can create an ETL pipeline using Snowflake to continuously shift data from the source to the destination data lake or warehouse. Often, raw data is first loaded temporarily into a staging table used as an interim container and then transformed with SQL queries before it is loaded into the destination. In-stream processing, this interim container is replaced by Kafka for deserialization.
